When IIS is installed, it
automatically creates a directory named c:\inetpub\wwwroot, which
represents your website. Any files in this directory will appear as
though they're in the root of your web server.
To add more pages to your web
server, you can copy HTML, ASP, or ASP.NET files directly to the
c:\inetpub\wwwroot directory. For example, if you add the file
TestFile.html to this directory, you can request it in a browser
through the URL http://localhost/TestFile.html.
You can even create subdirectories to group related resources. For
example, you can access the file c:\inetpub\wwwroot\MySite\MyFile.html
through a browser using the URL http://localhost/MySite/MyFile.html.
Using the wwwroot
directory is straightforward, but it makes for poor organization. To
properly use ASP or ASP.NET, you need to make your own virtual
directory for each web application you create. With a virtual
directory, you can expose any physical directory (on any drive on your
computer) on your web server as though it were located in the
c:\inetpub\wwwroot directory.
Before you get started, you
need to launch IIS Manager. To do so, open the Start menu, and type
"IIS Manager" in the search box. When the Internet Information Services
(IIS) Manager shortcut appears, click it.
The first thing you'll notice
about IIS Manager is the tree structure on the left side. Initially,
this tree shows a single item—your computer. Underneath are two groups,
named Application Pools and Sites, respectively. If you expand the
Sites group and then expand the Default Web Site item inside, you'll
see all the virtual directories that are currently configured on the
computer. Each one represents a separate web application.
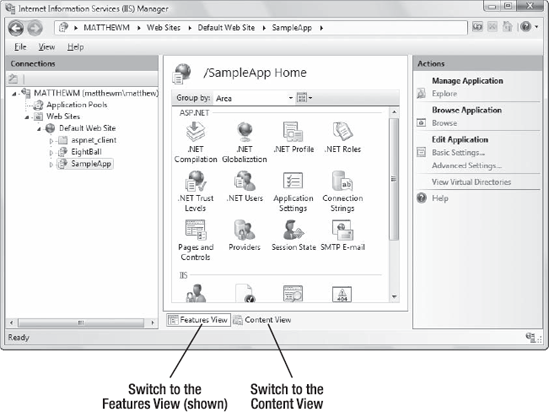
Figure 1 shows the IIS Manager window. It's divided into three parts:
On the left side is the website tree. In Figure 1, there are two web applications in the website tree: EightBall and SampleApp.
In
the middle is a useful set of icons that allow you to perform various
configuration tasks with the currently selected item in the tree, which
is usually a website folder. These icons are part of Features View.
Alternatively, you can switch to Content View by clicking the Content
View button at the bottom of the pane. In this case, you'll simply see
the contents of the selected folder. Click Features View to switch back.
On
the right side is the Actions pane, which includes links that let you
quickly perform a few of the most common tasks (again, based on the
currently selected item in the tree). This is a standard design that's
used in several Windows management tools.
Now that you've taken your
first look at IIS Manager, you're ready to get started managing your
websites. In the next section, you'll learn how to create your first
virtual directory.
1. Creating a Virtual Directory
When you're ready to deploy a
website on a computer that has IIS, the first step you'll usually take
is to create the physical directory where the pages will be stored (for
example, c:\MySite). The second step is to expose this physical
directory as a virtual directory through IIS. This means the website
becomes publicly visible to other computers that are connected to your
computer. Ordinarily, a remote computer won't be allowed to access your
c:\MySite directory. However, if you map c:\MySite to a virtual
directory, the remote user will be able to request the files in the
directory through IIS.
Before going any
further, choose the directory you want to expose as a virtual
directory. You can use any directory you want, on any drive, and you
can place it as many levels deep as makes sense. You can use a
directory that already has your website files, or you can copy these
files after you create the virtual directory. Either way, the first
step is to register this directory with IIS.
The easiest and most flexible way to create a virtual directory is to use the IIS Manager utility. Here's what you need to do:
To
create a new virtual directory for an existing physical directory,
expand the node for the current computer, and expand the Sites node
underneath.
Right-click
the Default Web Site item, and choose Add Application. The Add
Application dialog box appears, which requests several pieces of
information (Figure 2).
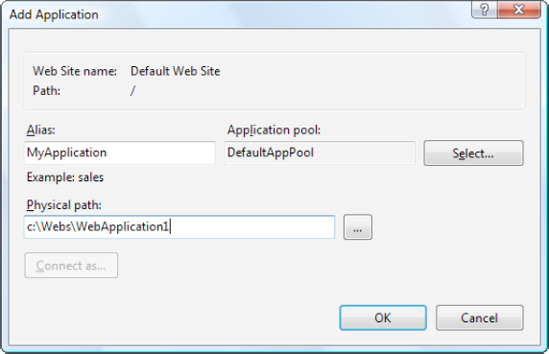
The first piece of information you need to supply is the alias—the
name a remote client will use to access the files in this virtual
directory. For example, if your alias is MyApp and your computer is
MyServer, you can request pages using URLs such as http://MyServer/MyApp/MyPage.aspx.
Next,
you need to choose the physical path. This is the directory on your
hard drive that will be exposed as a virtual directory. For example,
c:\inetpub\wwwroot is the physical directory that is used for the root
virtual directory of your web server. IIS will provide access to all
the allowed file types in this directory.
Next, you need to specify the application pool.
An application pool is a group of settings that applies to one or more
web applications (as described in the next section). Although the
standard DefaultAppPool option seems compelling, it actually isn't what
you want, because it relies on ASP.NET 2.0. To give your virtual
directory the ability to host ASP.NET 4, you need to explicitly choose
the application pool named ASP.NET v4.0. To do so, click the Select
button, pick it from the "Application pool" list, and then click OK.
To finish the process, click OK in the Add Virtual Directory dialog box.
When you finish these steps, you'll see your new virtual directory appear in the list in IIS Manager.
You can remove an
existing virtual directory by selecting it and pressing the Delete key,
or you can change its settings by selecting it and using the icons in
the Features View on the right.
Once you've created your
virtual directory, fire up a browser to make sure it works. For
example, if you've created the virtual directory with the alias MyApp
and it contains the page MyPage.aspx, you should be able to request http://localhost/MyApplication/MyPage.aspx.
|
Imagine you create a
virtual directory called MyApp on a computer called MyServer. The
virtual directory corresponds to the physical directory c:\MyApp. If
you add the subdirectory c:\MyApp\MoreFiles, this directory will
automatically be included in the IIS tree as an ordinary folder.
Clients will be able to access files in this folder by specifying the
folder name, as in http://MyServer/MyApp/MoreFiles/SomeFile.html.
By default, the
subdirectory will inherit all the permissions of the virtual directory.
However, you can change these settings using the IIS Manager. This is a
common technique used to break a single application into different
parts (for example, if some pages require heightened security settings).
This is also the source of a
common mistake in ASP.NET deployment. To understand the problem,
imagine you have a website in a folder named
c:\Applications\WebApps\Site1. This is the directory you should use
when you create your virtual directory. However, if you accidentally
create a virtual directory for the parent directory
c:\Applications\WebApps, you might not realize the error right away.
That's because you'll still be able to access the files in Site1
(because it's a subdirectory of your virtual directory WebApps).
However, when you try to request one of the web pages inside Site1,
you'll receive an error page informing you that the settings in the
web.config file aren't valid. The problem is that certain settings are
valid only at the application level, not the subdirectory level. To
solve this problem, remove the incorrect virtual directory and create
the one you really want. |